 So
I took a break from the banjo for a couple of weeks. Now I was ready to
get back into it. I was actually kind of surprised at how well things were
going and I began to think that I would be making another banjo after this
one. That made it easier to decide to go ahead and buy that reamer to get
the inside taper of the peg holes just right. Although, as I told a friend
and my wife will sadly verify, I'm not above buying a really neat specialized
tool that I'll only use once in my life. For that matter, if it is cheap
enough, I'm not above buying a really neat specialized tool at a barn sale
that I may NEVER use in my life! (Sorry, Laura. I love you, honey ...)
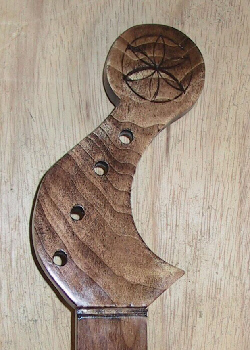
Anyway - I planed and sanded, smoothed and rounded, and before long I was
ready to stain and varnish the neck and hoop. Here's a close-up of some
scribed decoration on the head. The nut isn't in place yet but I was able
to make one out of a piece of rosewood. I might make a bone nut sometime
in the future - maybe the next banjo.
So
I took a break from the banjo for a couple of weeks. Now I was ready to
get back into it. I was actually kind of surprised at how well things were
going and I began to think that I would be making another banjo after this
one. That made it easier to decide to go ahead and buy that reamer to get
the inside taper of the peg holes just right. Although, as I told a friend
and my wife will sadly verify, I'm not above buying a really neat specialized
tool that I'll only use once in my life. For that matter, if it is cheap
enough, I'm not above buying a really neat specialized tool at a barn sale
that I may NEVER use in my life! (Sorry, Laura. I love you, honey ...)
Anyway - I planed and sanded, smoothed and rounded, and before long I was
ready to stain and varnish the neck and hoop. Here's a close-up of some
scribed decoration on the head. The nut isn't in place yet but I was able
to make one out of a piece of rosewood. I might make a bone nut sometime
in the future - maybe the next banjo.
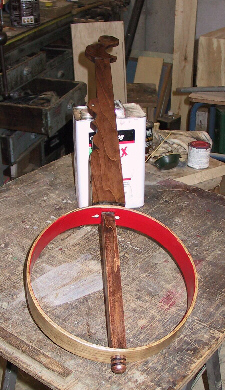
This was a pretty exciting moment for me when I put the
neck and hoop together. I wasn't sure how to make the neck fast to the
hoop so I drilled pilots for two brass screws. (BTW - have you noticed
how hard it is to get slotted screws today? Everything is going to philips
head ...) Not long after I found some images of other banjos and
see that a mortise and wedge would have been the way to go. Since then
I have done just that. I also painted the inside a bright japan red. I had read
that some period banjos were painted either green or red on the inside and I
thought that was pretty flashy!
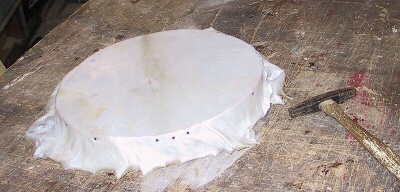 Putting on the head was a bit of a challenge mostly because I had NO idea
what I was doing. I decided to tack the head on to the hoop for this one
for that early home-made look. (I've already figured out how to make shoes,
tensioners and a hoop for banjo #2.) I soaked the goat-skin in the bathtub
for about 20 minutes. According to
Bob
Flesher in his "Learning Minstrel Banjo" this won't weaken the hide.
I tacked it on to one side of the hoop then went to the opposite side,
hand stretched it slightly and tacked that side. (I supported the hoop
on the end of one of my tinsmithing stakes when I did the hammering.) Then
I went 90 degrees to the other side and proceeded to finish tacking the
head on the same way you tighten a wheel rim back on to a car hub. I used
tiny #2 upholstery tacks that did not stick through the 1/4 inch thick
hoop. I wasn't very even because I was planning on covering the steel tacks
with a strip of scalloped red morocco leather held in place with brass-headed
tacks but it turned out I didn't like the look of that. Luckily (?) I got
the opportunity to put on a second head...
Putting on the head was a bit of a challenge mostly because I had NO idea
what I was doing. I decided to tack the head on to the hoop for this one
for that early home-made look. (I've already figured out how to make shoes,
tensioners and a hoop for banjo #2.) I soaked the goat-skin in the bathtub
for about 20 minutes. According to
Bob
Flesher in his "Learning Minstrel Banjo" this won't weaken the hide.
I tacked it on to one side of the hoop then went to the opposite side,
hand stretched it slightly and tacked that side. (I supported the hoop
on the end of one of my tinsmithing stakes when I did the hammering.) Then
I went 90 degrees to the other side and proceeded to finish tacking the
head on the same way you tighten a wheel rim back on to a car hub. I used
tiny #2 upholstery tacks that did not stick through the 1/4 inch thick
hoop. I wasn't very even because I was planning on covering the steel tacks
with a strip of scalloped red morocco leather held in place with brass-headed
tacks but it turned out I didn't like the look of that. Luckily (?) I got
the opportunity to put on a second head...
 I didn't know how tight to pull the head. When it was still wet it gave
a low and stately "boonk!" and when it dried overnight it rang out with
a really satisfying "poing!" Unfortunately, after I finished the banjo
I took it to school where I think the quick change from the cold of my
car to the dry heat inside was too much for the hide. It pulled away through
a couple of the tacks. Good news was - I made it so I could FIX it! More
good news was I had ordered 2 heads from Yendor,
just in case this happened. But as long as this pic is up I'll point out
the tail piece and bridge - both made from rock maple. I've since stained
the tailpiece nearly black to look like ebony and I am planning on making
a different bridge. The tail piece is held in place with sinew I use for
making
my
atlatls and darts. I figured out that by twisting the sinew after I
looped it over the end of the stick I could tighten it so that it would
not lay against the head. When I put on the second head I put the tacks
a little lower and did not trim the extra hide so close to them.
I didn't know how tight to pull the head. When it was still wet it gave
a low and stately "boonk!" and when it dried overnight it rang out with
a really satisfying "poing!" Unfortunately, after I finished the banjo
I took it to school where I think the quick change from the cold of my
car to the dry heat inside was too much for the hide. It pulled away through
a couple of the tacks. Good news was - I made it so I could FIX it! More
good news was I had ordered 2 heads from Yendor,
just in case this happened. But as long as this pic is up I'll point out
the tail piece and bridge - both made from rock maple. I've since stained
the tailpiece nearly black to look like ebony and I am planning on making
a different bridge. The tail piece is held in place with sinew I use for
making
my
atlatls and darts. I figured out that by twisting the sinew after I
looped it over the end of the stick I could tighten it so that it would
not lay against the head. When I put on the second head I put the tacks
a little lower and did not trim the extra hide so close to them.
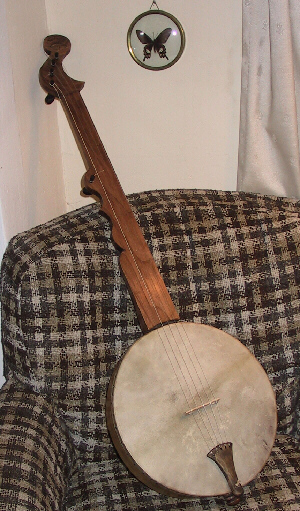
Well - here it is ... The tailpiece is darker now but
this is pretty much it. At first tuning it didn't seem quite right. For
one thing it is tuned lower than a modern banjo with steel strings. For
another thing - no frets made it tough for me to be sure where to tune
the strings in relation to each other until I went to a keyboard and figured
the A F# D A progression was the same four notes that began "Bicycle Built
for Two." Then the fifth string was D an octave higher than the 3rd string
so that was just the same interval as the first two notes for "Over the
Rainbow." (Can you tell I'm not a trained musician and I do most of my
music by ear
 Now
it's time to sit down with
Bob
Flesher's instruction book. Hope you enjoyed the visit. Wish me luck!
Now
it's time to sit down with
Bob
Flesher's instruction book. Hope you enjoyed the visit. Wish me luck!
(Great image on the cover - eh?)
One
more page: Making a tensioning system for the banjo head